Survival 3.0 Guide
By Ibby_, DragonsMaker, & oCrypt
Welcome to this Guide to playing the wonderful server that is MunchyMC Survival! This guide will cover most of the main features and will hopefully give you a good start to your adventure. The following topics are covered in this guide:
Server Rules
The MunchyMC Survival server follows the same rules as the rest of the network with additional server-specific ones which can be found by clicking here.
IMPORTANT NOTICE: Our griefing/theft policy has officially been changed! Griefing of unclaimed areas is no longer punishable.
*Chat offences on Survival include excessive swearing, toxicity, provocation and harassment among others. It also includes anything that would be considered NSFW.
*Griefing on Survival includes the destruction or raiding of any claimed player-made structure not belonging to the perpetrator. This includes, but is not limited to, breaking blocks, taking items, tampering with redstone, griefing with water or fire, killing pets or livestock and stealing crops.
Your Menu
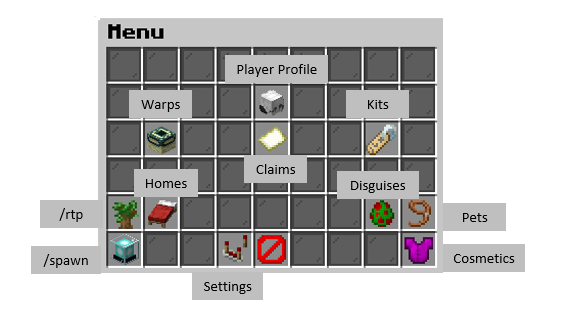
/menu is the most important command on Survival! This handy little command opens up your player menu GUI, from which you can do almost everything you could ever need to do on the survival server.
The Server Worlds
The server has a permanent world (One that never changes, for claiming and making bases) and three extra frequently-resetting worlds (for looting and mining).
The Main World:
This is the world you spawn in when you first arrive! It is a regular overworld with a 15kx15k border, where you can claim, adventure, make bases and farms, etc.
The Underworld:
Due to lack of usage, this world has been removed and will no longer be accessible for players.
Extra Worlds:
The command /warp portalroom will bring you to a room with portals that lead to the Nether, the End, or the Mining world. Here is a brief overview of what you can expect of each extra world:
Click me!
The Mining World: The Mining world is perfect for gathering resources and looting without having to worry about other people’s claims, plus it resets every two weeks so it will never run dry of resources. It works a little like a wilderness, so there you cannot claim anything inside of it, and griefing/raiding is allowed.
The End: The End can be accessed from the portal at /warp portalroom without having to find a stronghold. It resets every two weeks so there is plenty of chance to get some epic loot! The enderdragon is respawned every time the world is reset, but can also be respawned using end crystals (though a player-spawned dragon won’t drop an egg). Because it resets, claiming is disabled in the End. Griefing is allowed in this world.
The Nether: The Nether can be accessed from the portal at /warp portalroom or from any nether portal. Like the other worlds, it resets every two weeks. Because our economy is based on gold, nether gold ore has been removed and piglin/zombified piglin drops and nether loot have been altered. Claiming is disabled and griefing is allowed in this world.
Going Outside/Adventuring
When entering Survival for the first time you will likely want to start finding a place to set up your claim as well as collect some materials, as well as setting up teleports so you can find things easily!
Click me!
You can quickly go outside by using the command /rtp, and you will teleport to a random place on the map. You can use /rtp as many times as you want (with the exception of a short cool-down) in order to find certain materials you may need such as wood or food.
Setting Homes:
When you find a place you particularly like, you may want to set a home to return to that place later (especially your main base). You can use /sethome (home name) to create a personal teleport you can return to at any time by typing /home (home name). The number of homes you can set depends on your rank.
Warp Totems:
It’s also possible to create your own warps on the server using a warp totem. These are created by placing a beacon on top of a block of obsidian, and following the commands in chat to name it.
Click me!
You can have up to three warp totems. Totems cost a flat payment of 3000 gold each.
You are able to set the amount it charges a person every time they warp to your totem, and can change the name of your own totem any time you wish. Both of these options can be found by right clicking your totem in the warp totem menu:
To use the warp totems, right click the beacon on the totem and select which warp you would like to travel to. Totems can only be travelled to from another totem.
To use the warp totems, right click the beacon on the totem and select which warp you would like to travel to. Totems can only be travelled to from another totem.
Totems are sorted by the amount of ‘HITS’ or uses. The more popular a totem is, the higher it will be on the warp menu!
*It is discouraged to ‘farm’ hits, as it makes it unfair for other players.
Claiming Land/Gaining Claim Blocks
When you find a place you’d like to settle down and create a base, you want to claim that area to protect your land and valuables from other players.
Click me!
Claiming protects your land and prevents other players from building/breaking/stealing from it! Moderators are NOT RESPONSIBLE for the griefing of any UNCLAIMED land. You may only claim land in the main world, not the extra worlds. To select your land, imagine a box around the area you want to claim, then you can either:
-
Use a golden shovel from /kit starter and shift click on your first and second point (at the diagonal corners).
-
Stand where you want your first point, type /claim point1, and then stand on your second point, and type /claim point2.
Both methods work the same. To claim the area you select you must have enough claim blocks in your claim block balance, which shows to the right of your screen. If you don’t have enough blocks for that selection, you will be offered the option to buy the extra blocks you don’t already have with gold from your balance. You can also just claim a smaller area for the time being. As a starting player you already have at least 300 claim blocks, enough for a small-sized house. From there, you can start gaining more claim blocks and/or gold.
You can gain claim blocks by these means:
-
Just play! You automatically receive claim blocks every 5 minutes (even more blocks per minute depends on your rank).
-
By welcoming a player that just joined the server. When a new player joins, a message will spring up in chat to let you know. By typing “Welcome (New Player IGN)” you will receive 5 claim blocks for being the first, or 1 claim block if not.
-
You get 25 claim blocks per voting link for voting using /vote
-
Claim blocks can also be bought from the MunchyMC store: shop.munchymc.com
There are 2 types of claims you can make. Normal Claims, and Clan Claims.
Normal claims are made by individual players. You are free to add/remove whomever you like. This option is great for solo players or players who like to play with people who are not in their clan.
Clan Claims are special group claims that are shared by the members of your clan, and they have some very unique and special perks! See the Clans section for more information
OTHER CLAIM FEATURES:
- Have an abandoned claim right outside your base that is preventing you from expanding? This season, you have the option to appeal a claim through the normal ticket process. If moderators agree that the claim is NOT significantly built, and has been abandoned by an inactive player for an EXTENDED period of time, you may have a chance for its removal.
When appealing a claim, please make sure to include the co-ordinates of both your own claim and the claim you would like removing.
Blacklisted players’ claims are subject for removal at any time, but normally banned players will NOT have their claims removed, nor any of their items deleted.
Claim Editing
Eventually, you will likely be wanting to edit your claim. This is pretty simple to do, just type /claim edit or select the claims option in /menu (clan claims are edited by clan officials with a separate command, /clanmenu).
Within the /claim edit GUI, you can do the following actions:
Click me!
-
Expand and reduce your claim
-
Add/Remove members
-
Set Greeting/Farewell messages (displayed when entering/exiting claim area)
-
Enable/Disable Mob Spawning
-
Delete the claim entirely (You receive 90% of spent claim blocks for that claim back)
-
Set the claim’s name (You are entering name/You are exiting name)
You can also add players to your claim by standing in the claim you wish to add them to and typing /claim addmember [playername].
If someone is causing you issues and you would like to remove them from your claim, you have the option to /claim kick (to remove them to your claim border) or /claim ban (to prevent them from entering your clan until you unban them).
Expanding your existing claim is a common thing for players to do, and it’s simple to do. In the claim edit GUI you will be able to see all of your existing claims. Just click on whatever claim you want to expand, and then it will ask which direction you wish to expand in (north, south, east or west), and whether that’d be expanded 5 or 10 blocks.
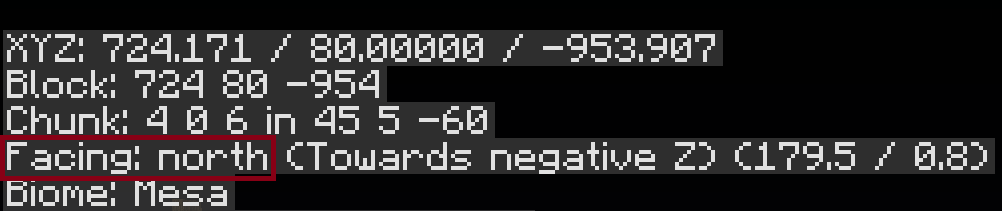
To check with direction you want to expand in, open up your debug menu by pressing F3 (Or Command+F3 in some cases). Within all that information, you’ll see a section that looks like the displayed image below. In the red outline you see the current direction, based on where you’re currently looking. That’s how you figure out which direction is which.
The amount of claims you can have depends on your rank, but most players start with the ability to create 3 claims. You can also purchase more claims on the MunchyMC store: shop.munchymc.com
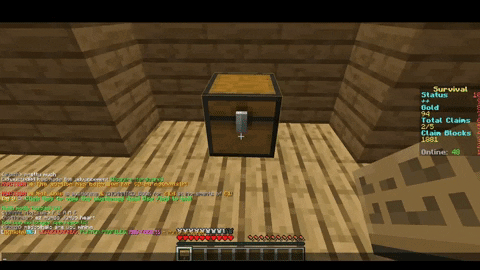
Chest/Door Locking
While having your friends added to your claim is almost a given, you may not want them digging around in all of your chests. With a plugin, you have the ability to easily set a sign that restricts certain chests to only specifically stated people.
Click me!
It’s simple: place a sign onto the chest or door you wish to lock (without shifting) and it should automatically place a lock sign on it.
If you want to add more people who can access the chest/door, right click the sign and type the command /lockette [line #] [playername]. If you wish to add more than two players, you can place another sign on the door/chest in the same way which will say [More Users]. Add players to this in the same way as you would to the original sign
Here’s a quick clip of how it should go:
And to add other players:
Gold Currency/Gaining Gold
The economy of Survival is based off of Gold. Gold is used to trade with other players for goods, expand your claim if so desired, used to bid in auctions, and maintain a Mall shop (more info on that below). That being said, you can gain gold in these ways:
Click me!
-
Mine and smelt gold ore you find
-
Sell items in auctions
-
Receive gold directly from players
-
Have players buy items in your Mall shop
When you mine gold, and have it in your inventory, smelt the ore into ingots, and you can use /deposit (amount) to add gold to your account. Use /withdraw (amount) if you ever need to take gold from your account. Use /pay (playername)(amount) to transfer gold to another player.
Auction System
As mentioned, auctioning is a great way to put your items up for sale for other players to buy and potentially generate quick money. Here’s how to do it:
Click me!
First off, make sure you are holding the item you wish to auction in your hand! Then use the following command:
/auc (starting price) (increment).
The starting price is the minimum amount of gold you wish to set on the auction. The increment is the minimum amount a bidder must bid, in order to set another bid. For example:
/auc 10 3
The minimum starting bid has to be at least 13. The next minimum is 16, and so on.
/auc 5 5
The minimum starting bid has to be at least 10. The next minimum is 15, and so on.
Of course, there will be cases in which no one buys your item, and so you receive it back. You may need to set the pricing lower in order to entice players more into buying your item. It all depends on who’s online, and whether or not someone may need the particular item you’re auctioning.
*If you want to showcase an item without auctioning it, you may perform the command “/showitem” while holding the item you wish to showcase to the server. Players cannot take the item, they simply have the option to look at it in chat! This is a great way to flex that OP sword you made, the netherite you just mined, or anything you wish!
You have a 5 minute personal cooldown between showing items
The server has a global cooldown of 2 minutes between showcased items.
The Mall
Another surefire way to generate some money is to set up a shop. To purchase your own shop, you will need to visit the mall by typing /warp mall.
Click me!
There are 2 sections of the mall. The normal shops (#17-122), and the VIP shops (#1-16). Odd numbered shops can be found on the left side of the mall, while even numbered shops can be found on the right. You can quickly travel to a specific mall shop number by doing the command “/shoptp #” or you may follow the directions within the mall spawn.
All shops can be rented one week at a time, for a maximum of two weeks. If you do not renew your rent every week, you will lose your shop!
VIP Shops cost 250 or 200 gold per week to rent. They are far larger than normal shops, and have a prime location, right by the spawn in the VIP segment of the mall.
Normal Shops cost only 100 gold per week to rent. They are the standard mall shop size, and are located in the main segment of the mall build.
Maintaining a shop can be very expensive, so it’d be a good idea to have a decent reserve of gold on your hands before purchasing.
Now that you have your shop, you can begin to set up chests to either sell to players, or buy from players. Setting up these chests is a process very similar to locking chests.
Buy/Sell Chests:
To begin, let’s say you want to sell diamonds to players in your shop. You want to label the chest as a Buy chest, because players will be buying the item displayed on the sign; it seems kinda’ backwards to some. If you wanted to buy diamonds instead, you can have players sell diamonds straight to you from the chest. The chest would be a Sell chest because players are selling items to you.
The format for setting up a shop sign is as follows:
Selling an Item
Buy
Price of Item (Price they will pay to buy, you don’t need to put a $)
Item Name (Diamond, Diamond Block, Glowstone, Fishing Rod, etc.)
Quantity (Number of Item they will pay for) (4 - they will pay whatever Price for 4 of whatever Item)
Buying an Item
Sell
Price of Item (Price you will pay to buy, you don’t need to put a $)
Item Name (Diamond, Diamond Block, Glowstone, Fishing Rod, etc.)
Quantity (Number of Item you will pay for) (4 - they will sell 4 of whatever Item for whatever Price)
When setting up chests meant to buy items from players, be mindful that you have the gold to pay them, and that you don’t end up buying more than you anticipated, as there’s no limit–players can sell to you until you either run out of Gold to pay them, or the chest becomes full.
It’s simple once you get it down. Here’s a clip of CatTech setting up a chest and sign meant to sell diamonds at the Price of 5, for 1 Diamond:

Mall NPCs:
The Mall has a couple of NPCs that buy and sell interesting items.
Crowbar NPC: This NPC will sell ‘Crowbars’. These are single use diamond picks that have the ability to mine spawners. They cost 100g each.
Vendor NPC: This NPC will sell a few different types of basic food items for reasonable prices. Very useful if you find yourself running low on supplies!
Quests
Quests are a brand new feature to Season 3. Quests are activities you can perform within normal survival gameplay to win special prizes, such as mini crates! To see the lists of quest types available to do, do the command “/quests”
Click me!

There are 6 types of quests you can complete.
Adventuring, Gathering, McMMO, PVP, Crafting, or Other.
There are 3 different rankings of quests: Iron, Diamond, and Emerald. Iron is the easiest to complete, while Emerald is the hardest! But keep in mind, the harder the quest, the better the prize. View each level’s quests in your /quests GUI.
When you complete a quest, a message will appear in chat confirming that you finished the task, as well as a fun particle show!
Want to find out who has finished the most quests in the server? Do /questtop to see!
Clans
Clans are a great way to hang out with your friends on the survival server! They cost tokens to set up and you can level/rank them up to get exciting perks and features.
Clans also have a new special feature - Clan Claims! These are special claims for all clan members which have unique perks and features, including flight and holograms!
For more information on creating and using clans, go to the Clan Help Page
For more information on creating and using clan claims, check out this Guide to Clan Claims and Perks
PvP
Munchy Survival now has togglable PvP! This is toggled on and off using /pvp - when enabled, you can give and receive PvP damage, when disabled, you can’t do either.
If you die due to PvP damage, you will automatically keep your inventory! You can still lose your inventory if you die to other forms of damage while your PvP is toggled on, so be cautious.
There is also a combat timer to prevent people from toggling off their PvP in the middle of a fight.
McMMO
McMMO is a common plugin that many survival-type servers utilize to provide a greater experience and goal for players aside from the standard vanilla survival genre.
Click me!
Basically, McMMO allows you to level up skills, which are mostly typical tasks a player would do normally (Such as woodcutting, mining, fishing, brewing, and many more). Each skill provides unique abilities once a certain level is reached, unlocking bonuses for practicing that skill. For example, leveling up your Acrobatics skill will increase the chance that you will not take damage after falling. A higher Mining level means that you have a greater chance of mining double the resource from a single block.
There’s really so much to learn about McMMO that it would be pointless to try to explain it all here. It’s so big, in fact, that there’s a whole wiki dedicated to the plugin. You can learn everything about all the skills offered, tactics for leveling up, and abilities unlocked on the wiki.
Ranks
What’s a server without ranks to help keep it alive? Here are all the benefits you can receive from purchasing a rank:
Click me!
Plus Benefits:
-
Green, italicized name
-
/back command (teleports you to the last location you teleported from)
-
/backpack command (Access to an inventory with 9 slots to carry more items on the go)
-
+10 home slots
-
/craft command (Opens up the crafting menu to craft anything without needing an actual crafting table)
-
/vipchat command (Access a channel in chat that only players with Plus and above can see and chat in)
-
/tp up (height) command (Teleport up as many blocks as you wish–be careful, this can be deadly!)
-
/carpet command (Spawns a platform beneath you, allowing you to travel terrain quickly and effectively)
-
Can use colored text on signs
-
/kit irontools command (Gives you basic Iron tools, with a cooldown)
-
/hat command (Lets you wear a block on your head, cosmetic only)
-
3 claim blocks every 5 minutes instead of 1
Plus-Plus Benefits:
-
ALL Plus benefits
-
/fly command lets you use creative style fly
-
/backpack command gives you 27 slots (As opposed to 9 in Plus)
-
+20 Home Slots
-
/rainbowchat command gives you access to the colourful new chat feature
-
/repair command (Lets you completely refill durability on any item, even enchanted, for free) This has a small cooldown between uses.
-
/cook command (Turns any raw food into cooked food)
-
/smelt command (Turns any ore into ingots)
-
/stack command (Converts any stackable items into stacks, basically organizing your inventory)
-
/kit ironextra command (Gives you basic tools, along with armor)
-
/ec command (Lets you access an Enderchest, anywhere, basically another backpack)
-
/tp command lets to instantly teleport to any player with /tptoggle enabled
-
/tpahere allows you to send a teleport request for a player to teleport to you
-
allows you to use colour codes on claim greeting and farewell messages
-
5 claim blocks every 5 minutes instead of 1
Global Ranks
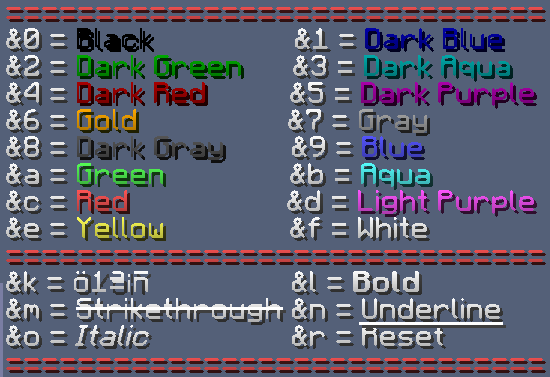
The server global ranks of Elite and Legend also give perks on survival! These include extra claims, extra homes and keepinventory. Legend also gives you the ability to use colours in chat!
Here’s a handy image that tells you all the color codes you can use:
Purchase ranks from the buycraft at shop.munchymc.com!
Crates
Crates are a favorite feature from Season 2! Keys to open specialty crates can be purchased from the MunchyMC store and contain all kinds of exciting things.
Click me!
Currently, we have one special crate survival players can open. It combines the absolute favorite items from Season 2 into one mega-crate!
-
Awesome Cosmetics
-
Epic Gadgets
-
Amazing Pets
-
Fun Disguises
-
OP Custom Enchantment Books
-
Claim blocks
-
Additional Claims
-
Gold
Each crate will give you a chance of getting any of these perks, and you will be guaranteed something from every crate you purchase.
Purchase crate keys from the buycraft at shop.munchymc.com!
In addition to normal crates, you have the option to earn mini crates from quests for free! These have some unique items perfect for adding an extra bit of detail to your builds, such as:
-
Custom Decorative Player Heads
-
Gold
-
Claim Blocks
Events
The staff members regularly host events on the server for everyone to enjoy!
Click me!
These usually take place at custom built events, and will be for a variety of prizes or just for fun. Bigger tournaments or events are often advertised on the forums or in the discord, so you have plenty of time to practice and prepare.
Often, we hold build contests where players are challenged to create a masterful build that follows a determined theme. These competitions can be fierce, which is why we often allow players to work with other players, depending on the event. Winners can get keys, ranks, or exclusive particles! The announcements for these will be listed on our forums and our discord, so keep your eyes peeled.
*The EVENT CENTER is an entirely different outlet than normal events that is coming very soon to the survival server. Players and staff can still host normal player-run events, it does not change that awesome aspect of the server.
Extra Features
Marriage
For those of you who are suckers for romance, survival has the ability for players to marry each other! Propose to your beloved (or bestie) using /propose [player] and get them to accept using /proposal accept [player]. If it doesn’t work out, you can divorce using /divorce [player]. Marriage allows you to /marry tp [player] (insta tp) and to /marry kiss [player]. It’s cute but cringe. Who knows why, but you can also marry yourself…
Are you a forgetful spouse? Do you tend to leave the wife somewhere? Well, you can always do /marry view to see who you are currently married to.
That is just about the entire basics of the Survival server. I hope you learned something new that will help you with your survival experience. Any suggestions are welcome!
Many thanks to everyone who helped with this post.
Many thanks to everyone who helped with this post.